
Google Classroom is one of the newest duties teachers have to do when accommodating students for the new school year. When I set up my first Google Classroom three years ago, I made some rookie mistakes that I avoided the next year and beyond. In this post, I will show you how to set up Google Classroom right the first time so you can have smooth sailing all year-long.

You don’t want to make these mistakes when you first set up Google Classroom for the new year.

Mistake #1 – Creating Just ONE Class in Google Classroom
Log into Google Classroom. Find the plus symbol (+) located on the upper right-hand side. You’ll be given a pop-up window that you will fill in with the name of the class, section, and subject. One mistake I made during my first year was to create just one class for all my students and all their assignments. It became a nightmare trying to find assignments and became unwieldy to manage.
Instead, make a new class for EVERY subject (English Language Arts, Math, Science, Social Studies, etc.). If you teach periods, make a class for every period. You might also want to create special classes for students you share with other teachers. For example, in my school, we switch students around for Response to Intervention (RtI) and English Language Development (ELD). So I created special classes just for the students in that group.
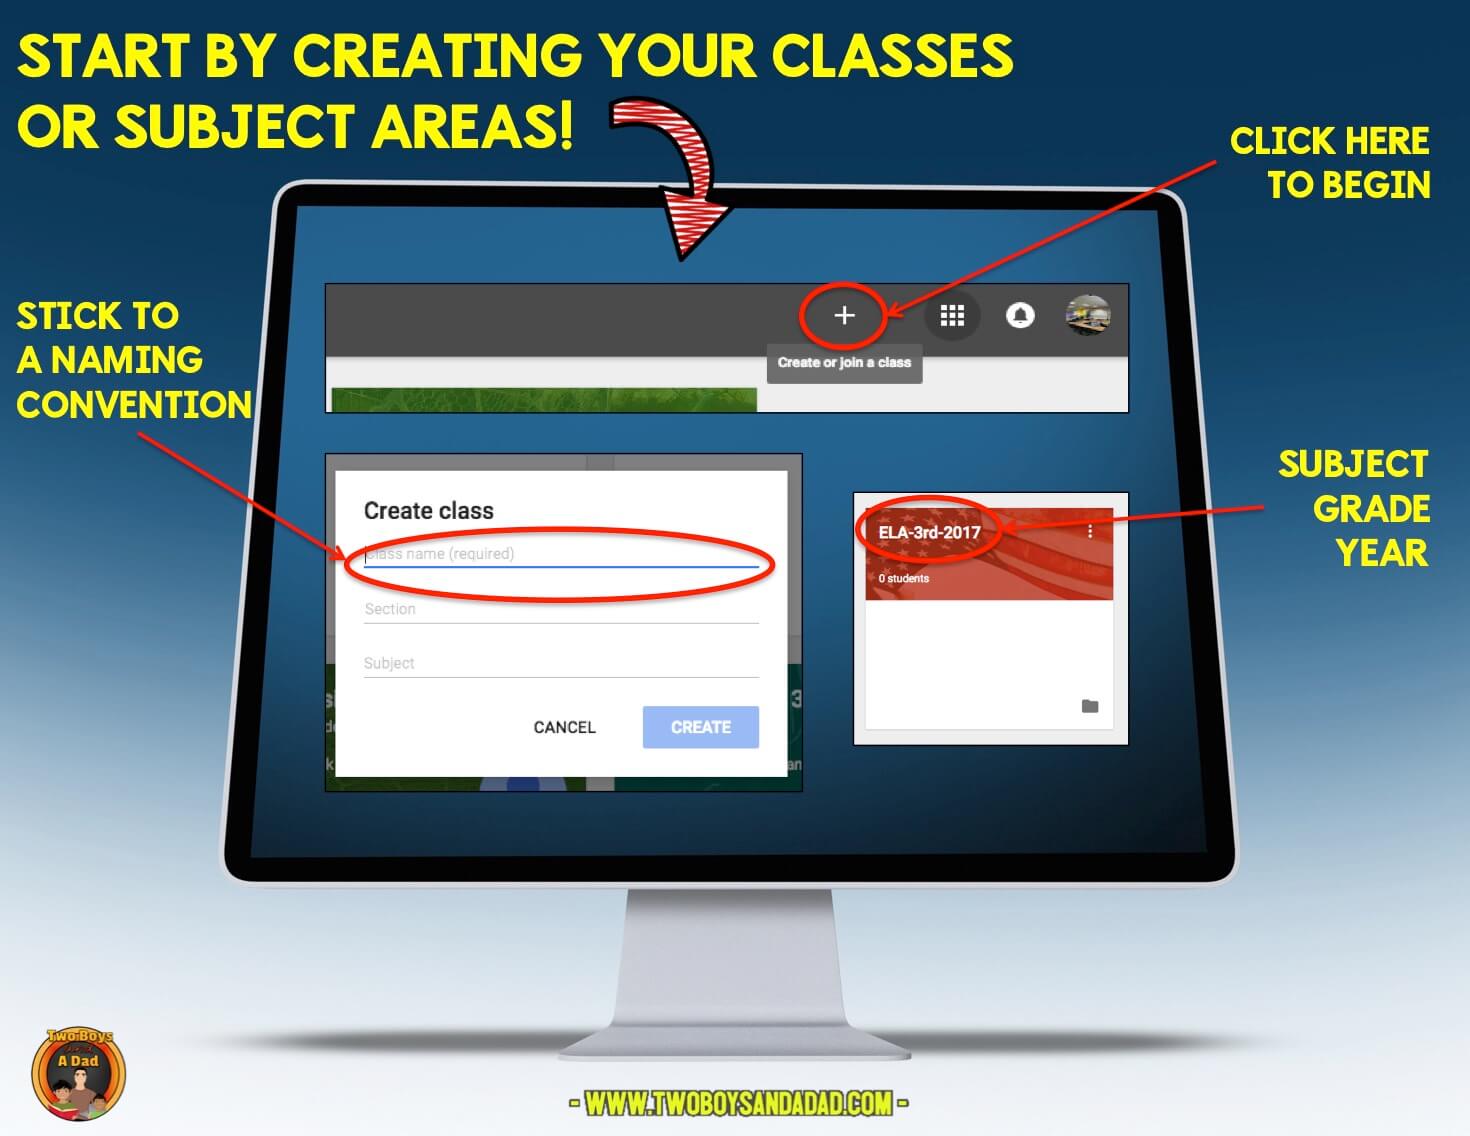
Mistake #2 – Not Using Naming Conventions and Customizations
Develop a way in which you will name each class or subject or period. This makes it much easier for students to find the correct class and therefore the assignment. If you look at the example below, I have used the following naming convention for my classes or subject areas:
- subject (use abbreviations when you can)
- grade (especially important if you teach a combination class or multi-age class)
- school year (once the school year is over, you can archive a class)

Google Classroom automatically assigns the color and background of each class when you initially set up. The newest feature of Google Classroom® allows the teacher to change the order of the classes by just grabbing and dragging the classes around. Before, the recent class would always be first. If you need to add more classes during the year, just click the plus symbol (+) again and create it.

Mistake #3 – Not Customizing Google Classroom
You can also customize the look of each classroom by clicking on a class name, then on the right side of the class header/banner click on SELECT THEME. Once you do that, you’ll be presented with the option to choose from pre-existing themes or patterns. You also have the choice of uploading your own photo. However, the dimensions of the picture are 2000 X 400 pixels. You can upload any photo, but you’ll have to drag it around inside the header to get it to show what you want.

Another important set-up feature is to make sure you add topics to each class. Topics are essentially like subheadings within a class. For example, I have an English Langauge Arts Class. But in that class, I can assign spelling, comprehension, grammar or vocabulary assignments. Without topics, students have to scroll around to find the exact assignment. With topics, you can give each assignment a topic. That way students can filter assignments by topic.

Mistake #4 – Not Turning Off Commenting
One of the biggest mistakes I made that first year was NOT monitoring or turning off the comments. Both teacher and students can add comments in Google Classroom.Click To Tweet That’s a nice feature if the teacher needs to have more detailed instructions or add more information to an assignment. There are lots of legitimate excuses and reasons to use the comment feature. Unfortunately, some students see the comment section as a texting feature and start sending comments to each other that ALL students can see.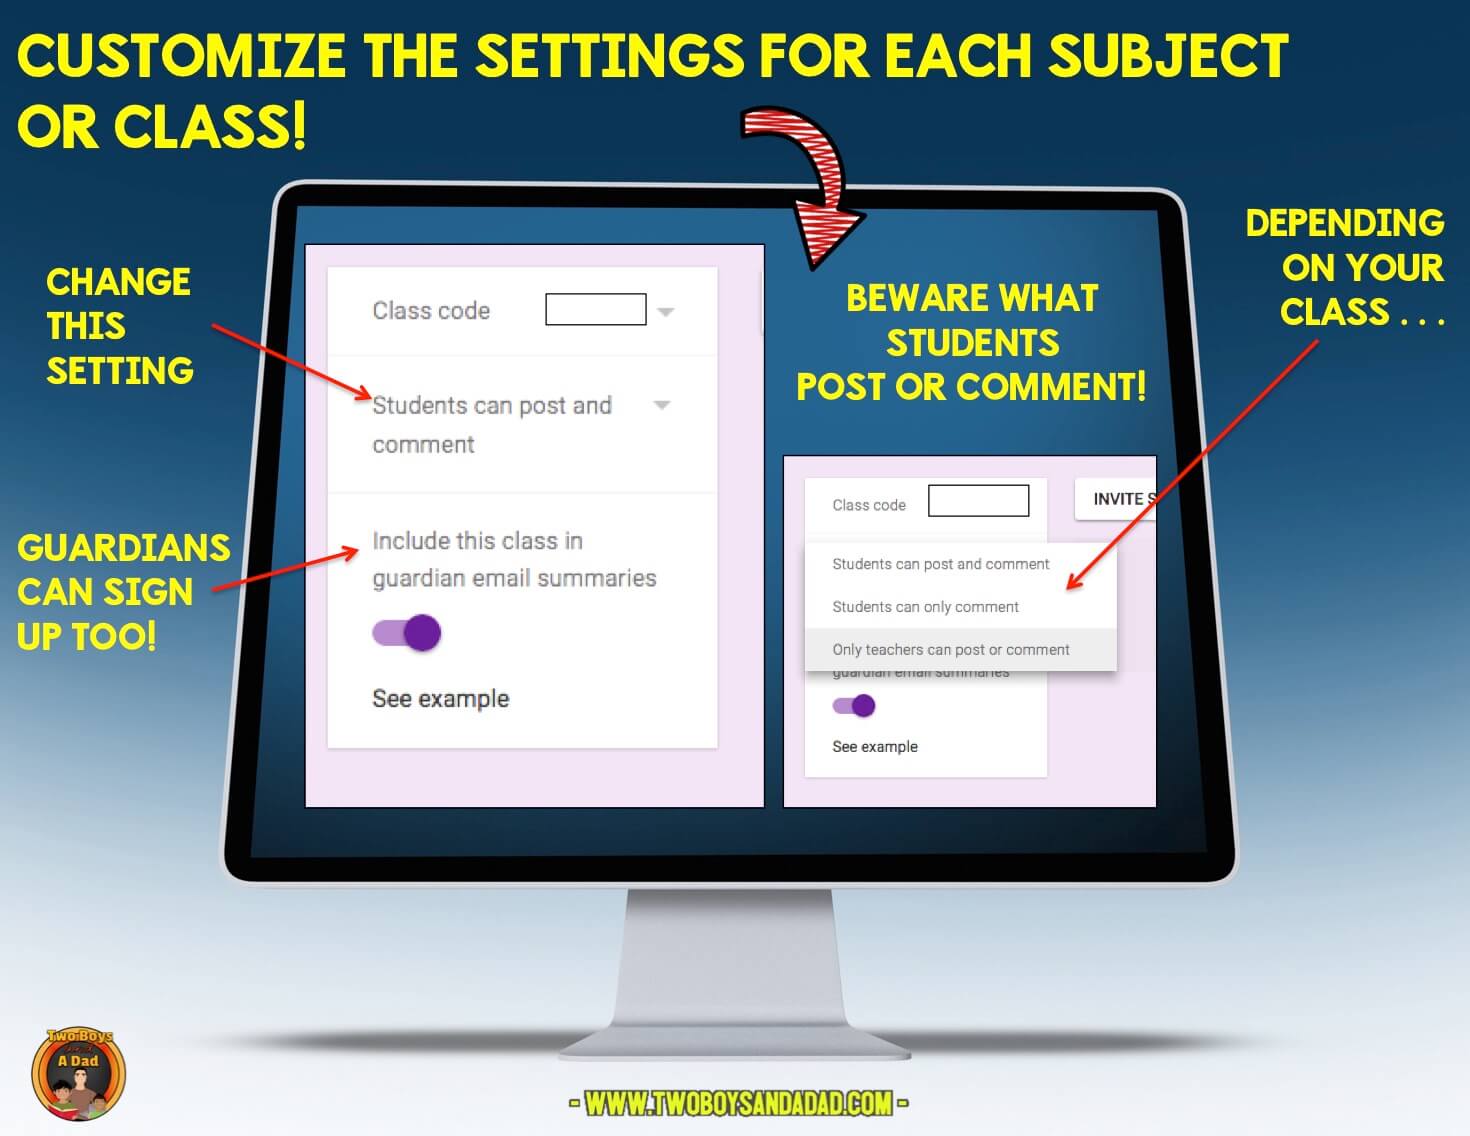
I had an incident in which two students were putting comments in the comments section writing about another student. They were not nice compliments. I had to take screenshots, email them to the parents and the students lost technology privileges for a week. That is when our Technology Itinerant Teacher showed me how to prohibit students from commenting. So I do that with every class. I turn off the ability for students to comment. Only the teacher can comment!
Mistake #5 – Not Keeping Guardians in the Loop in Google Classroom
A very nice feature of Google Classroom is the ability for parents and guardians to get updates about student assignments in each class. I discovered this feature when my own child entered seventh grade, and several of his teachers used this feature.Click To Tweet Parents can opt into receiving daily or even weekly updates via email. This was an incredibly useful feature to me as a parent of a middle schooler trying to keep him on track with assignments, projects, and homework. This feature also helps you be proactive with parents whose children are not putting forth an effort or are not turning in assignments on time.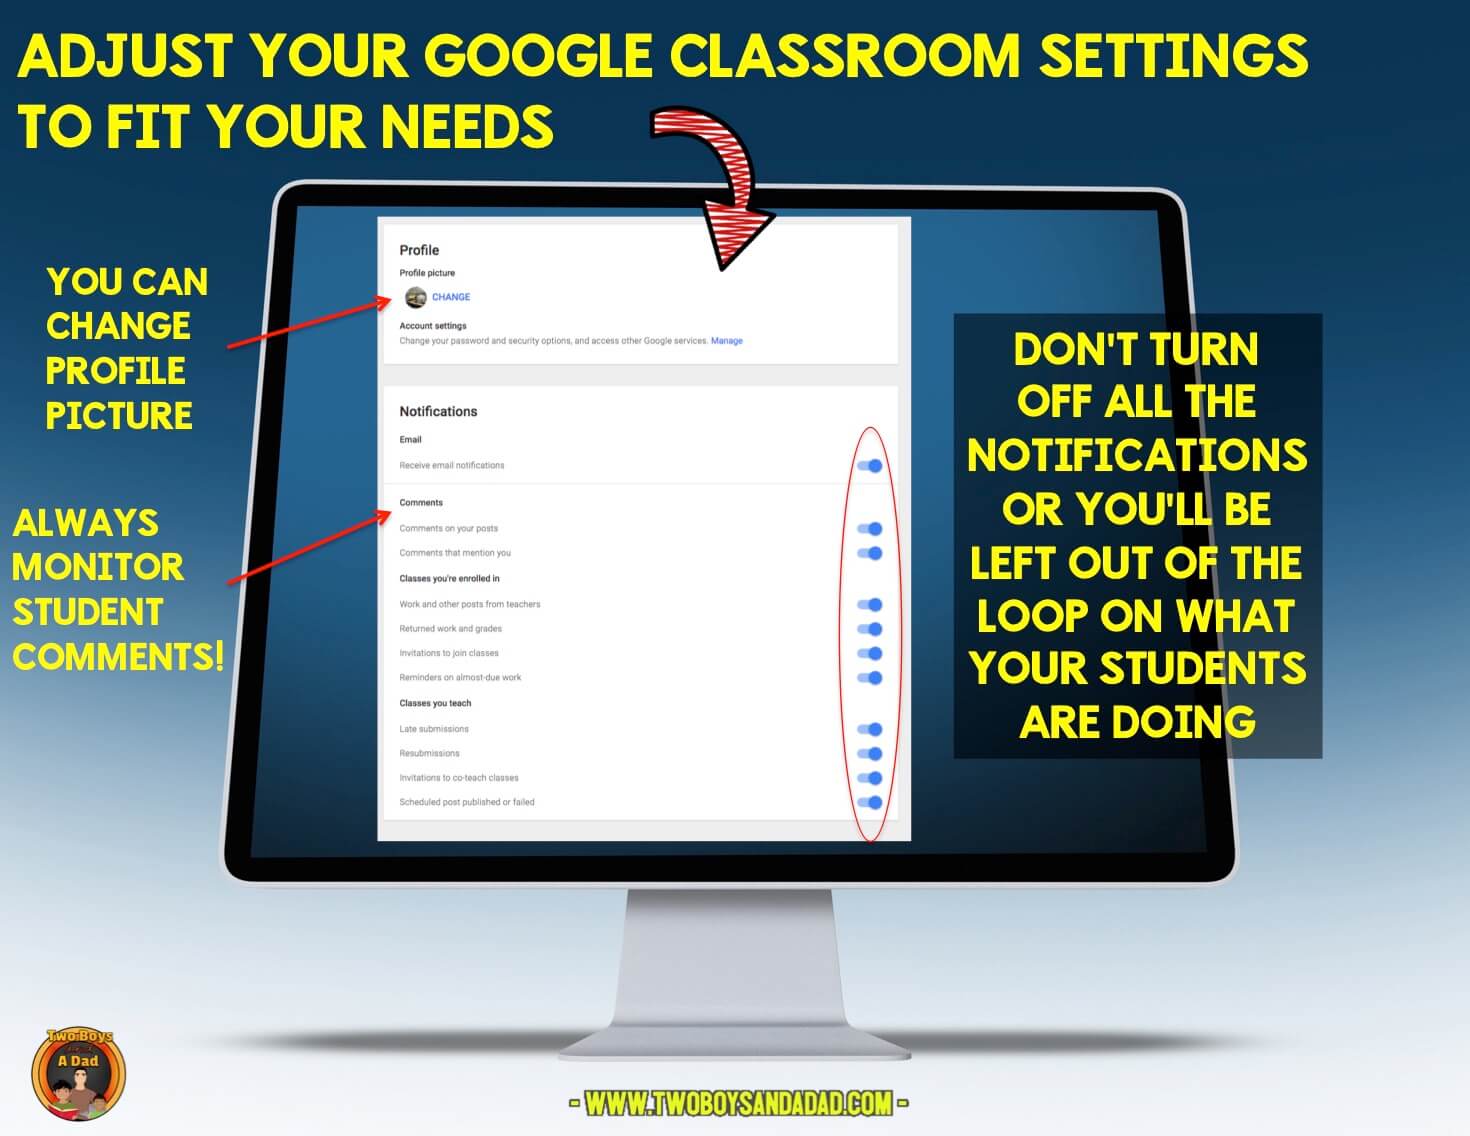
Added Bonus Mistake – Not Adjusting the Notifications for the Teacher
Your email inbox will be full of notifications when students turn in assignments, resubmit assignments, add comments, share docs with you, or a myriad of other things. You can turn all of them off. However, I caution against that because a student can say that he or she turned in an assignment that you didn’t know about! So it is better to leave ON all notifications so that all communication and notifications are given to you.
I would, however, change the profile picture because sometimes students will have several teachers who use Google Classroom. They can instantly recognize whose Google Classroom it is with your custom profile picture.
Invite Your Students in Google Classroom
Once you have all your classes in Google Classroom set up, it’s straightforward to add the students to each class.
A new feature of Google Classroom 2017 is the ability to project the JOIN code in full-screen mode.Click To Tweet Before you more or less had to recopy it onto the whiteboard large enough for everyone to see. Now, Google Classroom allows you to project the code in full screen. Once a student has joined the class or subject or period, only YOU can delete the student from the class during the school year. If you get a new student, no problem. Just give the new student the code, and they will instantly be added.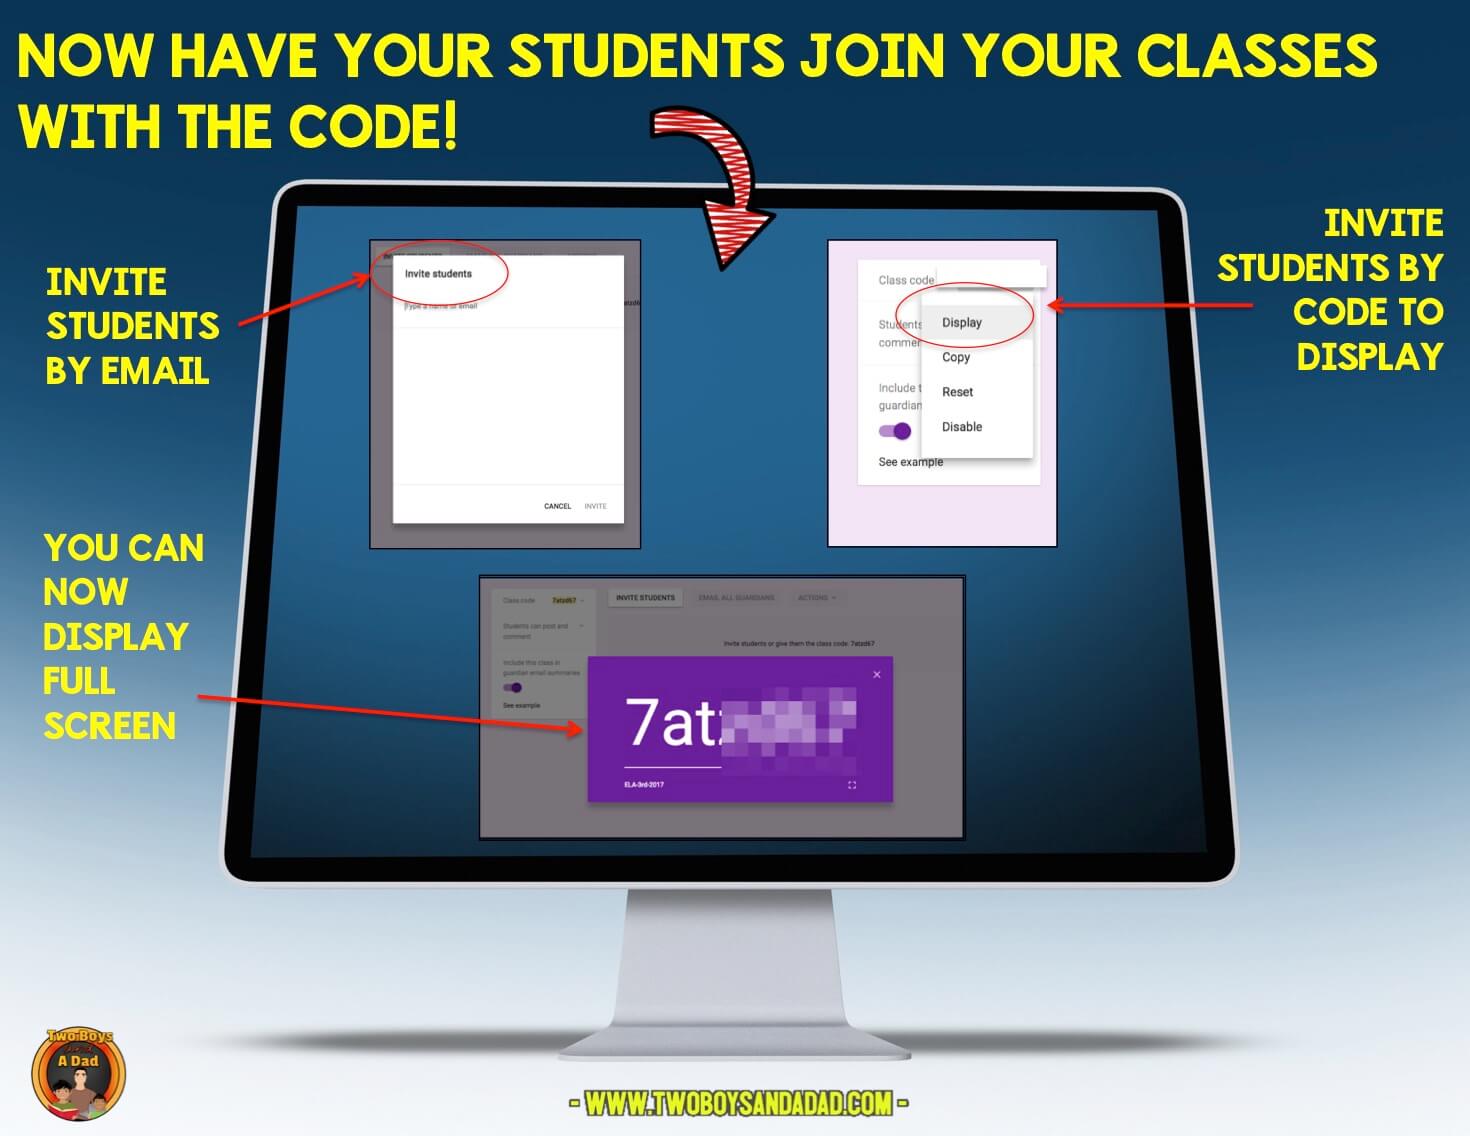
Another important feature is the ability to invite other teachers to be an administrator of the class. This is a fantastic feature if you co-teach or share students.
Don’t Go Yet!
New to a 1:1 setting? Check out my article with Valuable Tips for a 1:1 Classroom!
Check out how I use Google Classroom to present Back to School Night.
If you use Chrome, you’ll want to check out this post on the 25 Chrome Extensions for Teachers.
Do you need ready-made resources for Google Slides? Then check out these resources available in my store! Click on the custom categories for Google Drive Digital Resources.


I use this CONTROL KEY shortcuts poster with my students. Using the control keys increases productivity among the students. Get this poster for FREE!
Just sign up for my newsletter below and I’ll send you the link to the poster and a bonus student desk-sized version!
What other questions do you have about Google Classroom?
Ask them in the comments and I will do my best to answer them!


6 thoughts on “5 Mistakes to Avoid When Setting Up Google Classroom”
Your sticky note template does not work. Any advice?
Hello, can you be more specific about what doesn’t work? I clicked on the link in the PDF and that works. I opened the Google Slides template and that worked. The share settings are correct. So, I’m not sure exactly what isn’t working?
So when you begin a new school year, can you “age” the class? Just change the name from say “LA-6th-2019” to “LA-7th-2020” and then adjust the students (add new, delete who are not returning)?
If it is a different teacher, can you just add that new teacher and then somehow delete yourself? (useful for younger grades where the teacher only teaches one grade level.) or do you need to create a whole new class?
Hi Cindy, great questions! Yes, you can certainly just change the name of an existing class as you suggested. Then you can add or delete students as well. This is a convenient solution for those that loop with their class or have many returning students or just teach a small population. As for the second question, I actually had to research that one! In the past, I have added co-teachers. That is a straightforward option in Google Classroom. However, according to Google support, you can delete co-teachers but NOT the primary teacher or the teacher who initially created the class. I hope that answers your questions. Let me know if you have anymore. Claudio
Thank you for the great article. Its very helpful and beneficial for me in the future.
You’re welcome! Good luck!